Description
- Construct Spark cluster composed of 1 master, n of slaves, and jupyter-lab using docker-compose.
- Get experience of pyspark session and spark-livy service.
Introduction
(1) You’re recommended to use machine with 16GB memory or above. Also, you need linux shell environment with docker and docker-compose V2 installed. (I worked with MacOS system)
(2) Docker images are based on RedHat linux (Rockylinux 9) with bash shell, which is similar to real-world servers. Open-source versions are like below.
- jdk 1.8.0 (java 8)
- spark 3.4.0
- livy 0.7.0 (alpha version)
- python 3.11
(3) The reason of using jdk 1.8.0 is because of the compatibility with livy, The latest version is used in other things.
(4) All files related to this practice are in my github. If you’re used to Dockerfile, you can revise the image with Dockerfile in github.
https://github.com/hjben/docker
Sub-folders related on: jupyter-lab, spark
(5) This practice uses shell script files in folder named by docker-script, where are sub-folder of each folder in github. This shell files get some parameter from user, and then constructs cluster and executes some files needed. docker-compose.yml file also be generated automatically in same path, and deleted when the docker-compose is down.
(6) The docker images are in my docker hub. You can download them with docker pull command.
https://hub.docker.com/search?q=hjben&type=image
(7) If you have any problems, questions or bugs when using codes, just contact me.
Docker container construction
1. Download docker image
The version of image maybe changed up, with update of the open-source version.
docker pull hjben/spark:3.4.0-jdk1.8.0
docker pull hjben/spark:3.4.0-livy
docker pull hjben/jupyter-lab:spark-livy
2. Generate docker container.
(1) Download the shell script in spark/docker-script folder at the github and move them to the path where docker commands are available.
(2) With ./compose-up.sh command, docker network and containers are generated. parameters must be entered behind the command with one blank (space-bar) and arranged by the order below. The command will not be executed when lack of number of parameters or wrong input type detected.
- spark_version: Version of spark (3.4.0 and 3.1.1 is available now)
- (The # of) workers: The number of spark workers (integer between 1 and 5)
- (CPU)core: The number of CPU core of each spark worker (integer 1 or above)
- mem (GiB): The amount of memory size of each spark worker (integer 1 or above. The unit is GiB)
- jupyter_workspace_path: Host path for saving jupyter lab workspace data
- log_path: Host path for saving spark log
e.g.
./compose-up.sh 3.4.0 3 4 8 /Users/Shared/workspace/docker-ws/spark-notebook /tmp/spark_logs
(3) If you create spark containers, initialization and execution of spark will be done automatically. After running spark in background process, livy server also be executed in background. And then, jupyter lab service starts.
(4) Cause no resource limit exists when creating containers, there’s no problem when the sum of each worker’s core and memory may be exceed the host machine’s. Each container uses host resource flexibly.
(5) There are volumes mounted on host path in each container for logs or data backup. This volumes are used for keep the data when docker containers are broken. Host path must be set with compatibility of your test environment, through some parameters of ./compose-up.sh command. The host paths you’ll use are be made by yourself, preparing when they may not be automatically generated on the host.
(6) Execute ./compose-down.sh command if you want to destroy all containers.
(7) ./compose-up.sh command may mis-correct the generated docker-compose.yml file constructing another containers without compose-down command. So if you want to change the number of hadoop slaves, you’re recommended to run ./compose-down.sh first.
Spark Standalone
1. Execute spark
(1) Spark master and workers are run when the container created, you could save the time to enter spark execution command.
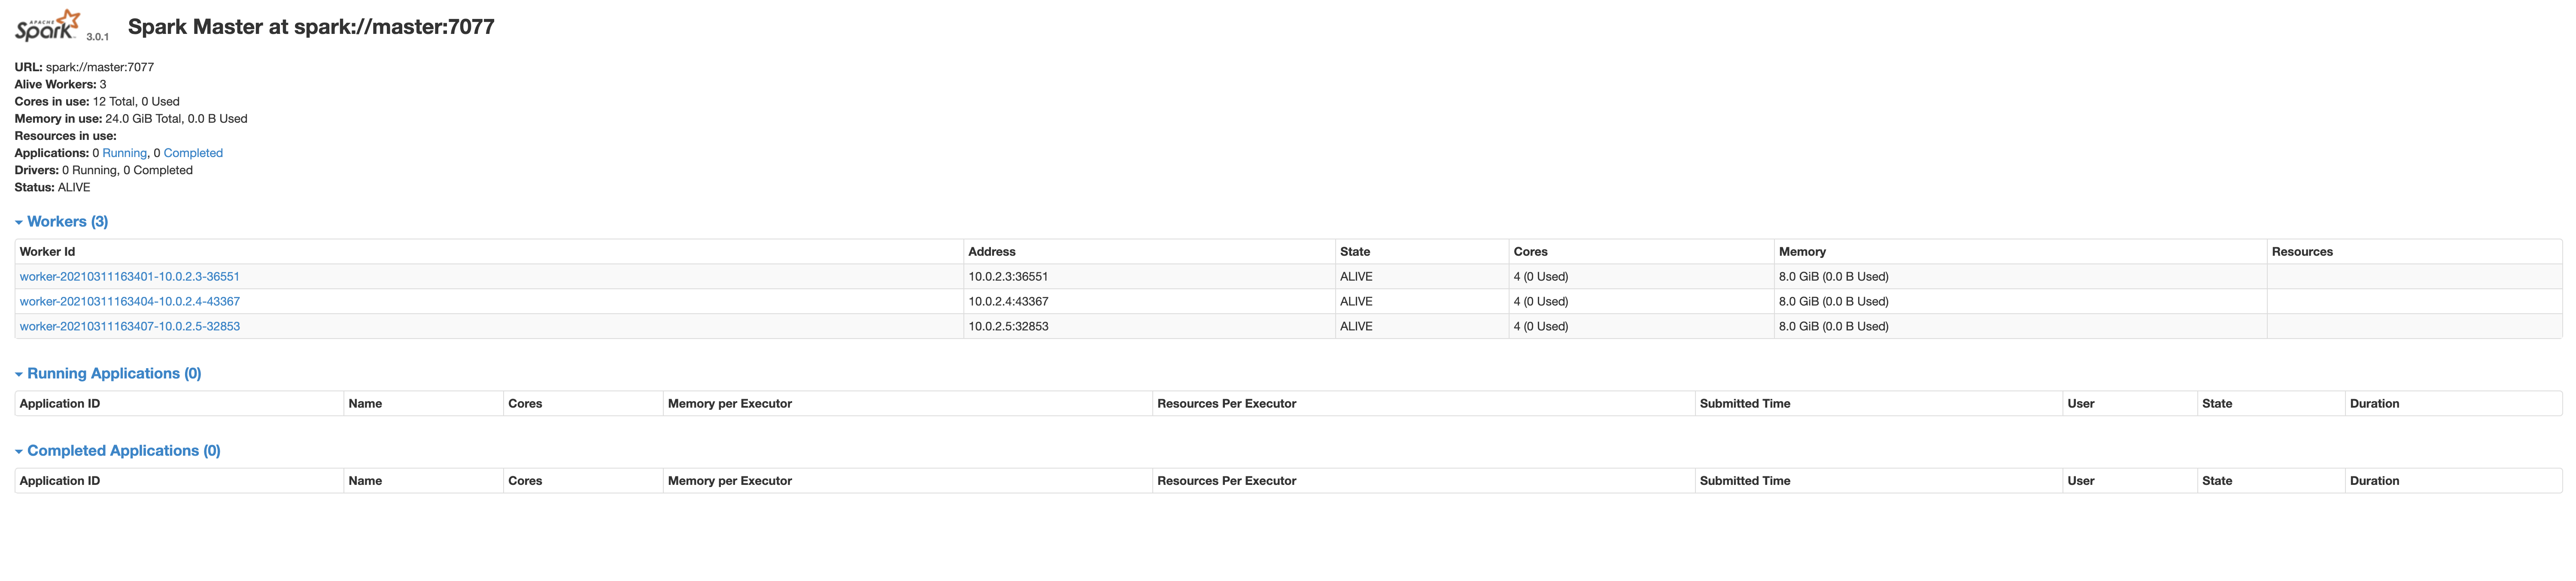
(2) If no errors found in the process above, you can access the spark web ui. The address of web ui is localhost:8080.
2. Execute jupyter lab
(1) Jupyter lab is also executed when the container created, no execution command is needed to run jupyter lab.
(2) Copy the URL in the console and access the jupyter lab service. Copy and Paste the address started with 127.0.0.1 to your web browser. Token is changing value every time you run.
e.g.
http://127.0.0.1:8888/lab?token=e76b79faeabb826699a80166e39c5627390923dc24e053aa
(3) Pyspark package for use spark with python, and some settings for linking with hadoop or livy are added in the jupyter lab container of spark cluster.
3. Pyspark session build
(1) Create a new notebook in the jupyter lab.
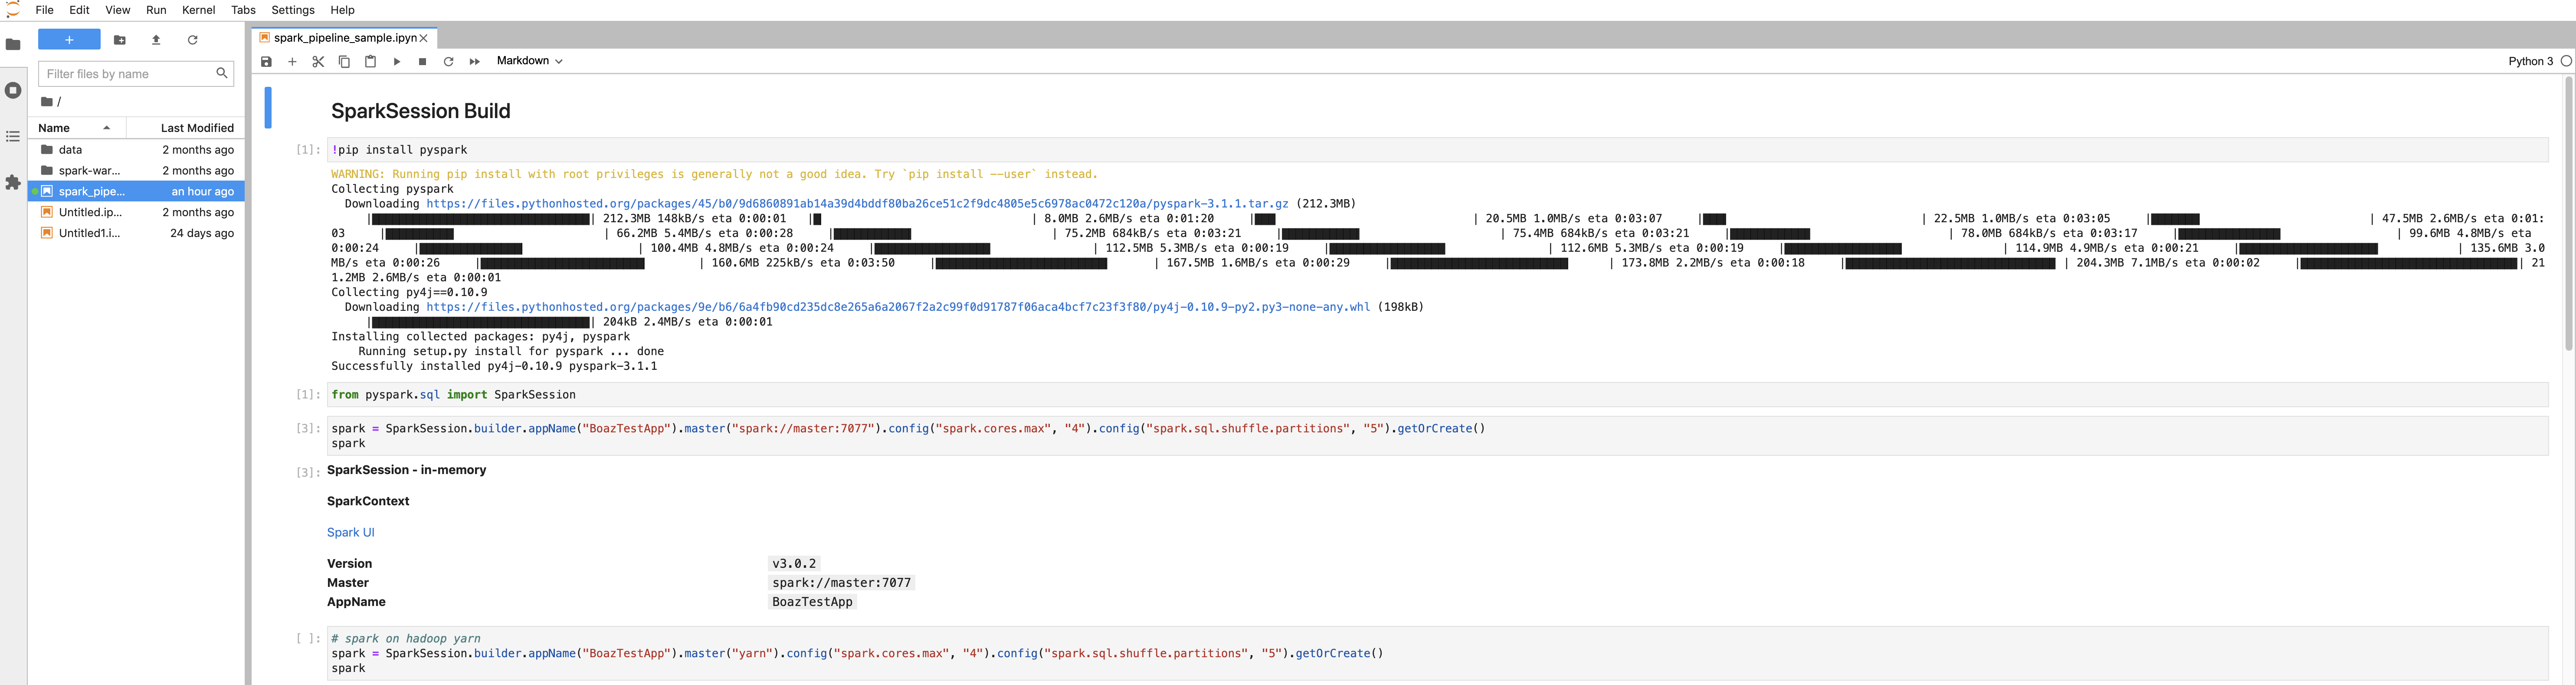
(2) Import SparkSession and build a spark session. The address of spark master is spark://master:7077, and also be set with the number of cpu core and amount of memory space. From now on, all codes running in the notebook is python code.
from pyspark.sql import SparkSession

spark = SparkSession.builder.appName("TestApp").master("spark://master:7077").config("spark.cores.max", "4").config("spark.sql.shuffle.partitions", "5").getOrCreate()
spark
(3) When created, spark session would be seen and managed in the spark web ui.
4. Data pre-processing with Spark
(1) Using the sample code in this zip file, you can test the data pre-processing and clustering with spark.
(2) The sample data and code is able to use after unzipping the attached file and uploading jupyter lab.
Spark with livy
Livy is a REST API server made for ease spark-job control at outside of the cluster. It’s in the spark master container.
1. Run livy server
(1) Livy is executed when the container created, no execution command is needed to run livy.
(2) If the result of docker exec -it master bash -c “livy-server status” command, however, is “livy server is not running”, restart the livy with ./livy-start.sh command.
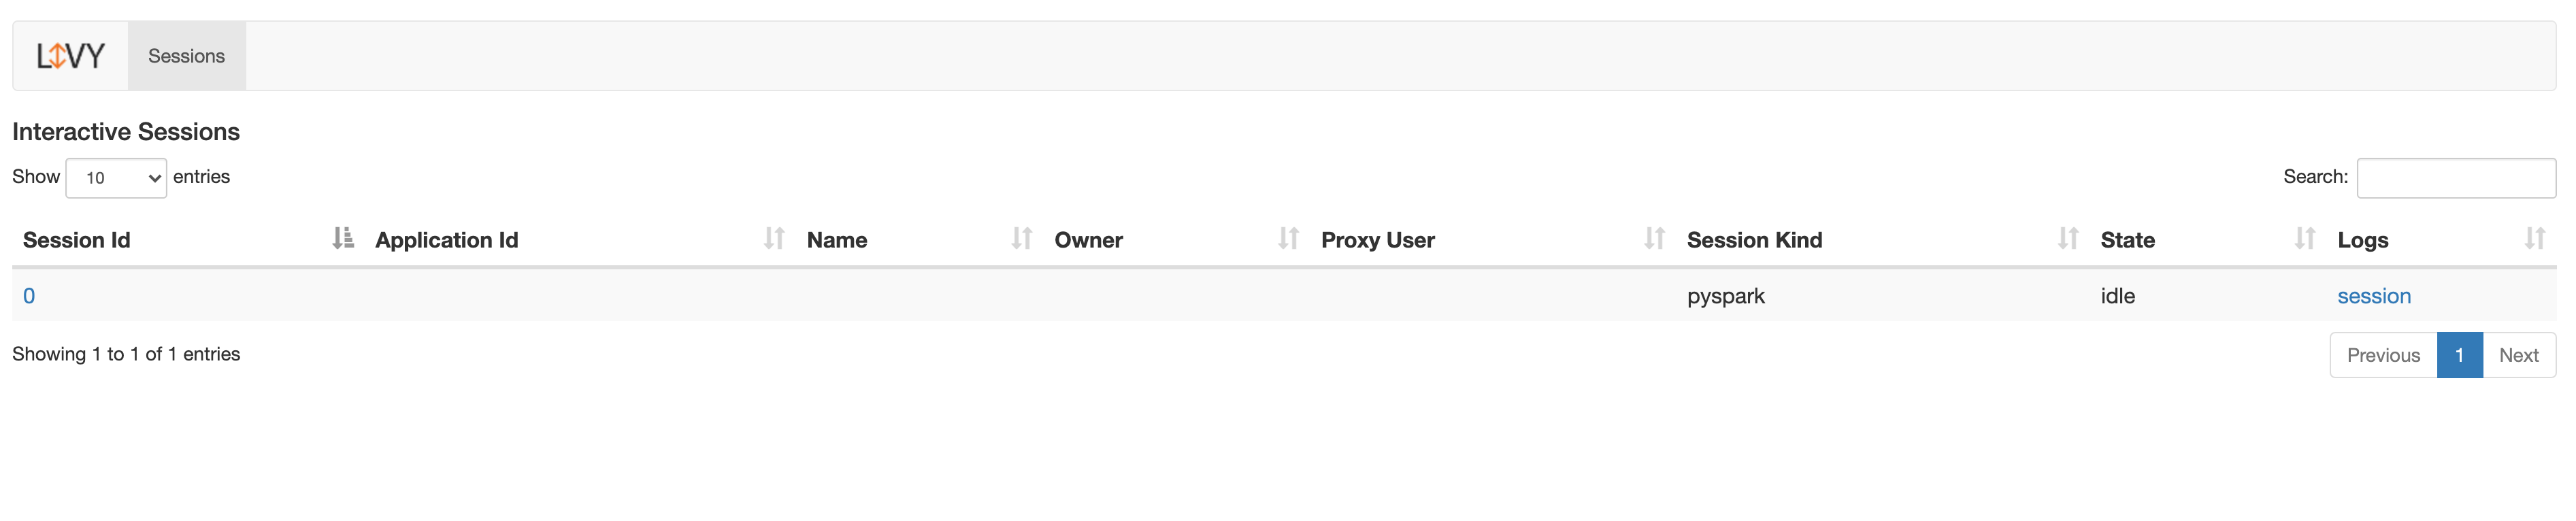
(3) The REST communication port of livy server is 8998, and have same of web ui. Then the adress of livy web ui is localhost:8998.
2. Livy sample code test
(1) Using the sample code in this zip file, you can communicate with the livy server through REST API.
(2) The sample data and code is able to use after unzipping the attached file and uploading jupyter lab.
Spark on Hadoop
You could create spark session by using the yarn scheduler of hadoop. If using yarn scheduler, the hadoop cluster is necessary. Then a new cluster contains hadoop service is needed. The new one is a hadoop cluster with master and n slaves, and one spark master and jupyter-lab is added on.
You’re going to create spark session with yarn when spark needs data in HDFS. If using yarn scheduler, spark session gazes the HDFS path when load a data. So there might be some trouble with uploading the sample data to HDFS.
When using spark-submit command, you could work with spark container. Spark bin is installed in the spark container and shares jupyter-lab’s data through volume mount.
1. Download docker image
The version of image maybe changed up, with update of the open-source version. A docker image is added for hadoop service. jdk 1.8.0 is used because of livy.
docker pull hjben/hadoop:3.3.5-jdk1.8.0
2. Generate docker container.
(1) Download the shell script in spark/docker-script/hadoop folder at the github and move them to the path where docker commands are available.
(2) With ./compose-up.sh command, docker network and containers are generated. parameters must be entered behind the command with one blank (space-bar) and arranged by the order below. The command will not be executed when lack of number of parameters or wrong input type detected.
- spark_version: Version of spark (3.4.0 is available now)
- (The # of) slaves: The number of hadoop slaves (integer between 1 and 5)
- (CPU)core: The number of CPU core of each spark worker (integer 1 or above)
- mem (GiB): The amount of memory size of each spark worker (integer 1 or above. The unit is GiB)
- jupyter_workspace_path: Host path for saving jupyter lab workspace data
- spark_log_path: Host path for saving spark log
- hdfs_path: Host path for saving hdfs data
- hadoop_log_path: Host path for saving hadoop log
- hadoop_version: Version of hadoop (3.3.5 and 3.3.0 is available now)
e.g.
./compose-up.sh 3.3.5 3.4.0 3 /Users/Shared/workspace/docker-ws/spark-notebook /tmp/hadoop /tmp/hadoop_logs /tmp/spark_logs
3. Execute hadoop
(1) After the containers are built, Hadoop service is started in the containers automatically.
(2) In the first time of run hadoop, HDFS volume would be formatted to use them.
4. Execute jupyter lab
(1) When created containers, CLI used is occupied by foreground process of hadoop, Open a new CLI(=shell) at host to start jupyter lab separately. Then, move into the path docker scripts are in.
(2) Enter ./jupyter-start.sh command to run jupyter lab.
(3) Copy the URL in the console and access the jupyter lab service. Copy and Paste the address started with 127.0.0.1 to your web browser. Token is changing value every time you run.
e.g.
http://127.0.0.1:8888/lab?token=e76b79faeabb826699a80166e39c5627390923dc24e053aa
(4) The livy service is also available, but the position of livy server is changed to spark container. The solution is revise access host from master to spark in the sample code of livy.
5. Pyspark session build
(1) Create a new notebook in the jupyter lab.
(2) Import SparkSession and build a spark session. Set spark master to yarn.
from pyspark.sql import SparkSession
spark = SparkSession.builder.appName("TestApp").master("yarn").config("spark.cores.max", "4").config("spark.sql.shuffle.partitions", "5").getOrCreate()

spark
(3) When created, spark session would be seen and managed in the hadoop job web ui (localhost:8088).
(4) If you’re using yarn as spark master, the target data should be in hdfs, not notebook workspace.